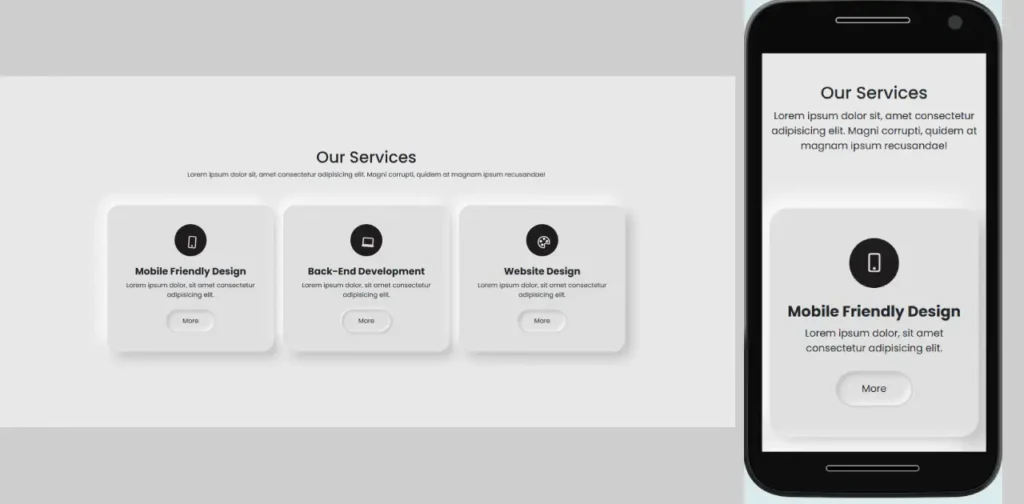
Welcome to an exciting journey where you’ll learn how to create stunning responsive cards with HTML CSS! This step-by-step guide includes free code that you can download and use. By the end of this article, you’ll have beautifully designed cards that adapt to any screen size. Let’s dive right in!
Why Responsive Cards Matter
Responsive cards are a versatile way to showcase information on your website. Whether it’s services, products, or team details, these cards will:
- Enhance user experience.
- Provide a professional look.
- Adjust seamlessly on mobile, tablet, and desktop screens.
Tools We’ll Use
To make these cards interactive and visually appealing, we’ll use:
- HTML for structure.
- CSS for styling.
- Media Queries for responsiveness.
- Google Fonts (Poppins) for typography.
- Bootstrap Icon Library for icons.
- @keyframes Animation for shaking effects.
Free Code Included!
Feel free to copy the code snippets below or download the complete project using the button at the end.
Steps to Build Responsive Cards
1. Include Bootstrap and Icons
First, add Bootstrap CSS and JavaScript along with the Bootstrap Icons library to your HTML file. Place the following lines in the <head>
<link href="https://cdn.jsdelivr.net/npm/[email protected]/dist/css/bootstrap.min.css" rel="stylesheet"
        integrity="sha384-QWTKZyjpPEjISv5WaRU9OFeRpok6YctnYmDr5pNlyT2bRjXh0JMhjY6hW+ALEwIH" crossorigin="anonymous">

<!-- Bootstrap Icons  -->
<link rel="stylesheet" href="https://cdn.jsdelivr.net/npm/[email protected]/font/bootstrap-icons.min.css">
<!-- Bootstrap Icons end  -->
Add JS before the closing <body> tag
<script src="https://cdn.jsdelivr.net/npm/[email protected]/dist/js/bootstrap.bundle.min.js"
        integrity="sha384-YvpcrYf0tY3lHB60NNkmXc5s9fDVZLESaAA55NDzOxhy9GkcIdslK1eN7N6jIeHz"
        crossorigin="anonymous"></script>
2. Create the HTML Structure
Here’s the basic structure for our responsive cards:
<!-- Our services -->
    <section class="our-services-area py-5 vh-100 d-flex align-items-center">
        <div class="container">
            <div class="row gap-4 gap-md-0">
                <div class="text-center mb-5">
                    <h1>Our Services</h1>
                    <p>Lorem ipsum dolor sit, amet consectetur adipisicing elit. Magni corrupti, quidem at magnam ipsum
                        recusandae!</p>
                </div>
                <div class="col-md-4 text-center">
                    <div class="service_card px-3 py-5">
                        <div class="service_icon m-auto ">
                            <i class="bi bi-phone"></i>
                        </div>
                        <h2 class="mt-4">Mobile Friendly Design</h2>
                        <p class="mb-4">Lorem ipsum dolor, sit amet consectetur adipisicing elit.</p>
                        <button>More</button>
                    </div>
                </div>

                <div class="col-md-4 text-center">
                    <div class="service_card px-3 py-5">
                        <div class="service_icon m-auto ">
                            <i class="bi bi-laptop"></i>
                        </div>
                        <h2 class="mt-4">Back-End Development</h2>
                        <p class="mb-4">Lorem ipsum dolor, sit amet consectetur adipisicing elit.</p>
                        <button>More</button>
                    </div>
                </div>

                <div class="col-md-4 text-center">
                    <div class="service_card px-3 py-5">
                        <div class="service_icon m-auto ">
                            <i class="bi bi-palette"></i>
                        </div>
                        <h2 class="mt-4">Website Design</h2>
                        <p class="mb-4">Lorem ipsum dolor, sit amet consectetur adipisicing elit.</p>
                        <button>More</button>
                    </div>
                </div>

            </div>
        </div>
    </section>
    <!-- Our services end -->
3. Add the CSS
Use the following CSS to style your cards with a neomorphic design and animations:
 @import url('https://fonts.googleapis.com/css2?family=Oleo+Script:wght@400;700&family=Poppins:ital,wght@0,100;0,200;0,300;0,400;0,500;0,600;0,700;0,800;0,900;1,100;1,200;1,300;1,400;1,500;1,600;1,700;1,800;1,900&display=swap');
        /* Our services */
        body {
            font-family: "Poppins", serif;
        }
        .our-services-area {
            background-color: #e8e8e8;
        }
        .service_card h2 {
            font-size: 1.5rem;
            font-weight: bold;
        }
        .service_card {
            border-radius: 30px;
            background: #e0e0e0;
            box-shadow: 15px 15px 30px #bebebe,
                -15px -15px 30px #ffffff;
        }
        .service_card button {
            background-color: #e0e0e0;
            border-radius: 50px;
            box-shadow: inset 4px 4px 10px #bcbcbc, inset -4px -4px 10px #ffffff;
            color: #1f1d1d;
            cursor: pointer;
            padding: 15px 40px;
            transition: all 0.2s ease-in-out;
            border: 2px solid rgb(206, 206, 206);
        }
        .service_card button:hover {
            box-shadow: inset 2px 2px 5px #bcbcbc, inset -2px -2px 5px #ffffff, 2px 2px 5px #bcbcbc, -2px -2px 5px #ffffff;
        }
        .service_card button:focus {
            outline: none;
            box-shadow: inset 2px 2px 5px #bcbcbc, inset -2px -2px 5px #ffffff, 2px 2px 5px #bcbcbc, -2px -2px 5px #ffffff;
        }
        .service_icon {
            width: 80px;
            height: 80px;
            background-color: #1f1d1d;
            border-radius: 50px;
            color: #fff;
            display: flex;
            align-items: center;
            justify-content: center;
        }
        .service_icon i {
            font-size: 30px;
            animation: shaking 3s infinite;
        }
        @keyframes shaking {
            0% {
                transform: translate(0, 0) rotate(0deg);
            }
            25% {
                transform: translate(5px, 5px) rotate(5deg);
            }
            50% {
                transform: translate(0, 0) rotate(0eg);
            }
            75% {
                transform: translate(-5px, 5px) rotate(-5deg);
            }
            100% {
                transform: translate(0, 0) rotate(0deg);
            }
        }
        @media only screen and (max-width: 600px) {
            .vh-100 {
                height: auto !important;
            }
        }
Creating Responsive Cards Explained
- HTML Structure: Organized into a container with rows and columns for easy responsiveness.
- Neomorphic Design: Cards styled with soft shadows for a 3D look.
- Animation: Icons shake slightly for an engaging effect.
- Media Query: Ensures the design adapts to smaller screens.
FAQ for Responsive Card Layout
1. Can I customize the design?
Absolutely! You can change colors, icons, or animations to suit your website’s theme.
2. Is Bootstrap necessary?
While not mandatory, Bootstrap simplifies responsiveness and layout management.
3. How can I use the code?
Simply copy and paste the code into your project. You can download the complete code below.
Download Free Code of Responsive Cards with HTML CSS
Download the Complete Code
Happy coding! Let me know in the comments if you have any questions or need help.


